Deep dive into a fullstack framework for React
Marco Pollacci
07/05/2024 - Phygital Hub
Hello Folks!
 Marco Pollacci
Senior Software Developer @GELLIFY
Marco Pollacci
Senior Software Developer @GELLIFY

What is NextJS?
NextJS is a React framework for building full-stack web applications. You use React Components to build user interfaces, and NextJS for additional features and
optimizations
Under the hood, NextJS also abstracts and automatically configures tooling needed for React, like bundling, compiling, and more. This allows you to focus on building your
application instead of spending time with configuration.
Whether you're an individual developer or part of a larger team, NextJS can help you build interactive, dynamic, and fast React applications.
https://nextjs.org/docs#what-is-nextjs
👇To create a project just use👇
npx create-next-app@latest my-next-app
Need to install the following packages:
create-next-app@14.1.2
Ok to proceed? (y) y

✔ Would you like to use TypeScript? … No / Yes //Yes
✔ Would you like to use ESLint? … No / Yes //Yes
✔ Would you like to use Tailwind CSS? … No / Yes //No
✔ Would you like to use `src/` directory? … No / Yes //Yes
✔ Would you like to use App Router? (recommended) … No / Yes //Yes
✔ Would you like to customize the default import alias
                    (@/*)? … No / Yes //Yes
Creating a new NextJS app in ....
👇Once the installation process is finished, you just need to execute the command👇
npm run dev

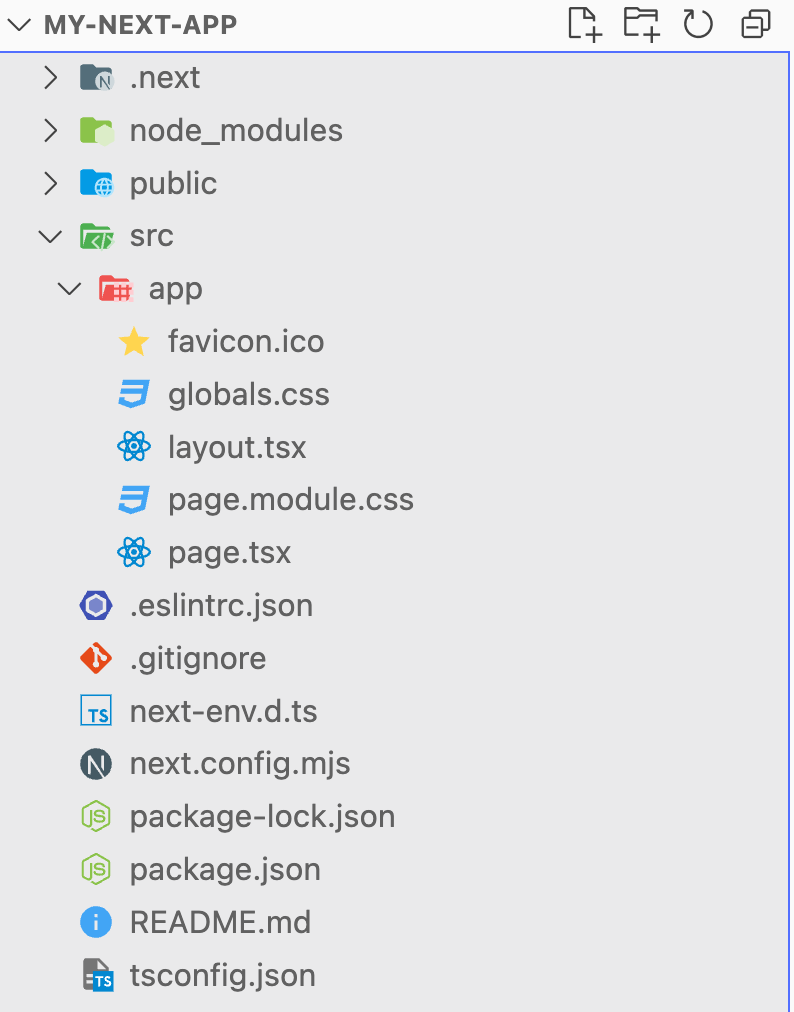
Project Structure
Project Structure
-
layout.tsx: Shared UI structure definition.
👉
-
page.tsx: Individual page component file
👉
-
global.css: Global styles for the entire application.
👉
-
page.module.css: CSS module for individual page components.
👉
-
next.config.mjs: Configuration file for NextJS
👉
-
public/: Directory containing static assets accessible directly by the client
👉
NextJS configuration file
NextJS can be configured through a next.config.mjs file in the root of your project directory with a default export
      /**
      * @type {import('next').NextConfig}
      */
      const nextConfig = {
        /* config options here */
      };

      export default nextConfig;
🛠️ Example of some aviable configuration 🛠️
🛠️ basePath
basePath allows you to set a path prefix for the application. For example, to use /docs instead of '/'
      const nextConfig = {
        basePath: '/docs',
      };

      export default nextConfig;
🛠️ crossOrigin
Use the crossOrigin option to add a crossOrigin attribute in all <script> tags generated by the next/script component
      const nextConfig = {
        crossOrigin: 'anonymous',
      };

      export default nextConfig;
🛠️ logging
You can configure the logging level and whether the full URL is logged to the console when running NextJS in development mode.
      const nextConfig = {
        logging: {
          fetches: {
            fullUrl: true,
          },
        },
      };
      export default nextConfig;
🛠️ rewrites
Rewrites allow you to map an incoming request path to a different destination path.
        //....
        async rewrites() {
          return [
            {
              source: '/about',
              destination: '/',
            },
          ]
        }
👇 Follow this link for more information and options! 👇
https://nextjs.org/docs/app/api-reference/next-config-js
Routing System
Routing System
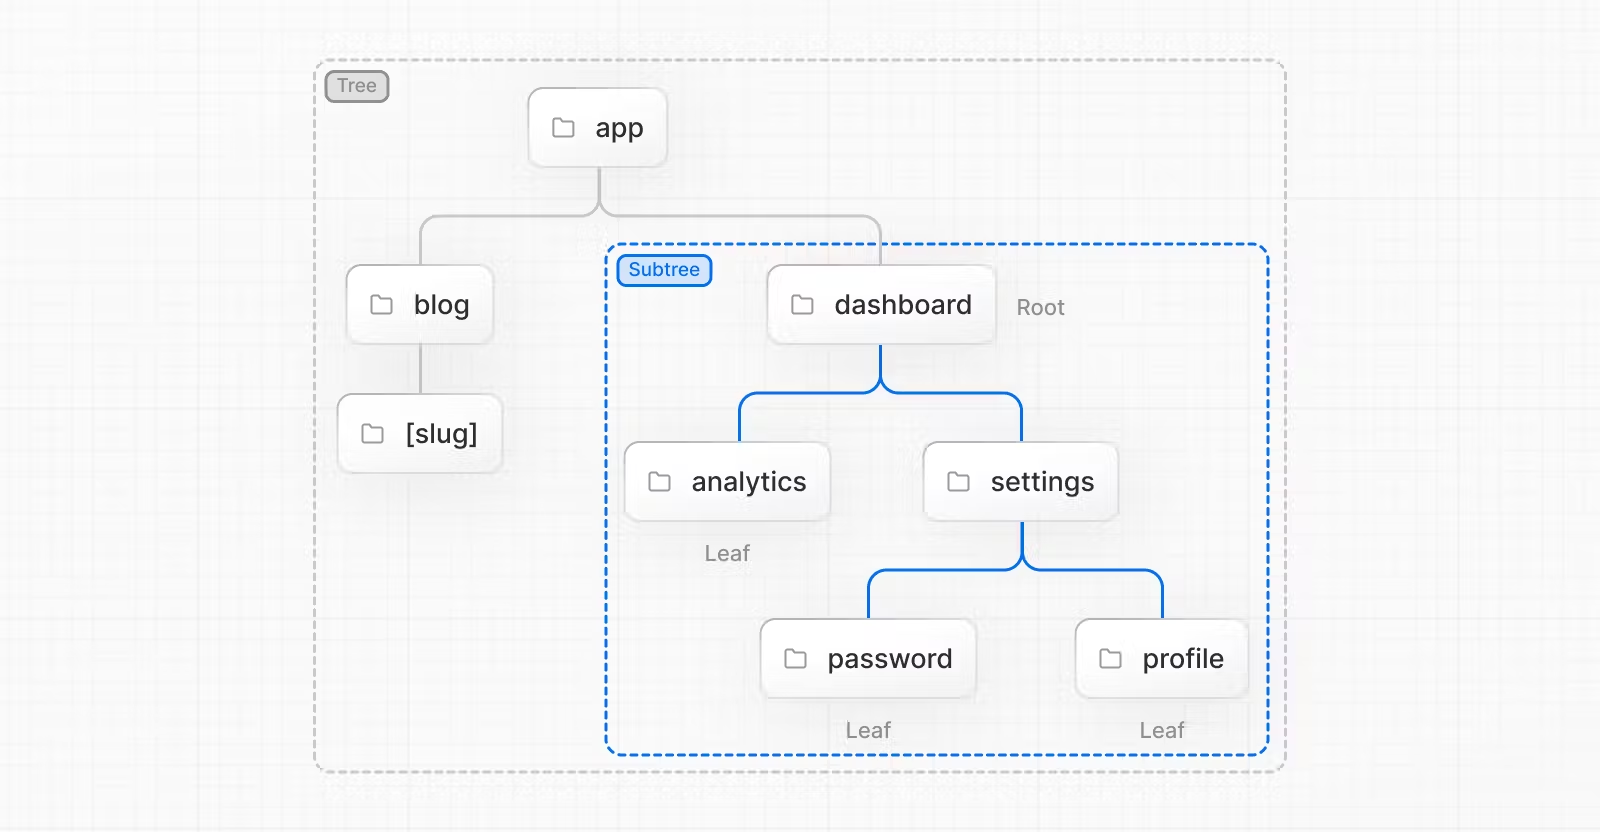
By convention, the folder organization has been structured as follows:
- 📌 Tree: the entire routing hierarchy
- 📌 Subtree: each branch stemming from a root node
- 📌 Root: each node from which a branch originates
- 📌 Leaf: each node that has no more children
For example, to reach the
analytics component, it will be sufficient to follow the hierarchy and it will correspond to
<root>/dashboard/analytic
❶
❷
❸
Based on the filesystem organization, even for those approaching the framework for the first time, it will be easy to understand the various generated URLs
Route Segments
Each folder in a route represents a route segment. Each route segment is mapped to a corresponding segment in a URL path.

Colocation
In addition to special files, you have the option to colocate your own files (e.g. components, styles, tests, etc) inside folders in the app directory.
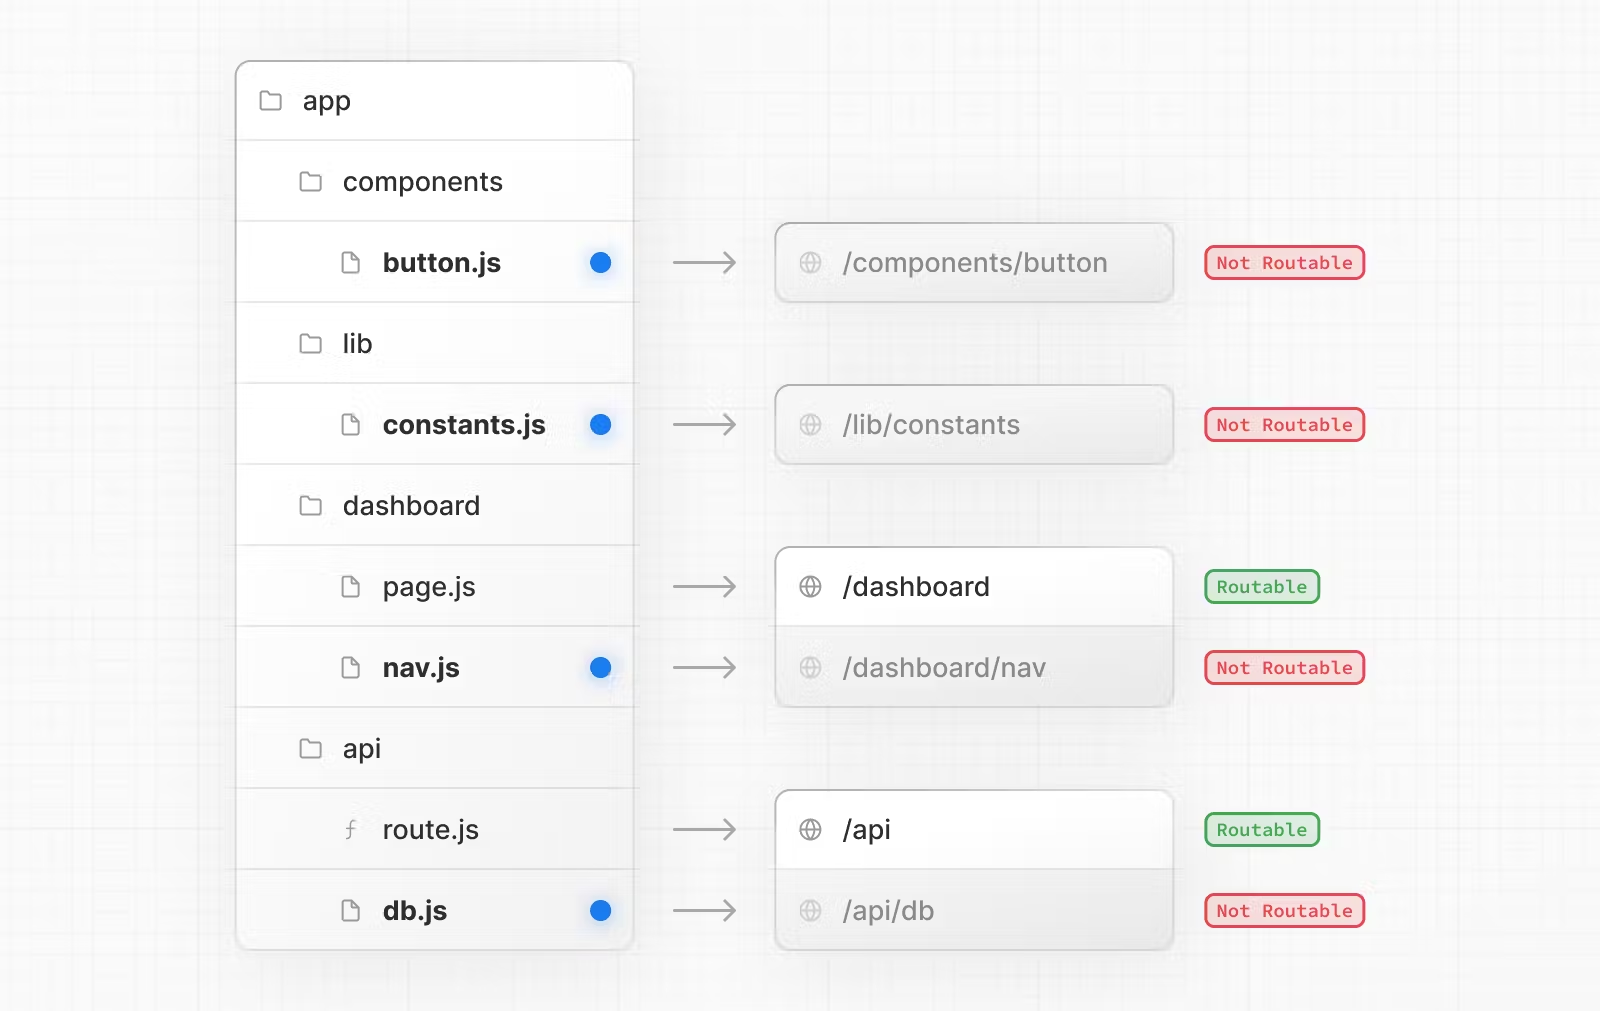 This is because while folders define routes, only the contents returned by page.js or route.js are publicly addressable.
NextJS provides a set of special files to create UI with specific behavior in nested routes
📢
layout.tsx
page.tsx
loading.tsx
not-found.tsx
error.tsx
global-error.tsx
route.tsx
template.tsx
default.tsx

But first, a bit of history.
Before the introduction of server components, NextJS primarily relied on React components, which are client-side components rendered on the browser.
These components are part of the client-side rendering (CSR) approach where the entire page is initially rendered on the client side.
By default, NextJS uses CSR, where React components are rendered on the client's browser. When a user navigates to a page, NextJS sends the necessary JavaScript bundles
to the browser, which then executes React to render the page.
Server Components 🗄️
React Server Components allow you to write UI that can be rendered and optionally cached on the server.
🙌 Some Benefit 🙌
- 📌 Fetching: Server Components allow you to move data fetching to the server, closer to your data source
-
📌 Security: Server Components allow you to keep sensitive data and logic on the server, such as tokens and API keys, without the risk
of exposing them to the client
-
📌 Performance: Server Components allow you to cache the UI on the server, reducing the amount of work the client needs to do
- 📌 SEO: Server Components allow you to render the UI on the server, improving SEO and performance
-
📌 Initial Page Load and First Contentful Paint (FCP): On the server, we can generate HTML to allow users to view the page immediately,
without waiting for the client to download, parse and execute the JavaScript needed to render the page.
Streaming: Server Components allow you to split the rendering work into chunks and stream them to the client as they become ready. This allows the user to see parts of the page
earlier without having to wait for the entire page to be rendered on the server.
Bundle Sizes: Server Components allow you to keep large dependencies that previously would impact the client JavaScript bundle size on the server. This is beneficial for users
with slower internet or less powerful devices, as the client does not have to download, parse and execute any JavaScript for Server Components.
Important
By default, NextJS uses Server Components. This allows you to automatically implement server rendering with no additional configuration,
and you can opt into using Client Components when needed.
To use Client Components, you must add 'use client' at the beginning of the file.
Client Components 🙂↔️
Client Components allow to write interactive UI that is prerendered on the server and can use client JavaScript to run in the browser
🙌 Some Benefit 🙌
-
📌 Interactivity: Client Components can use state, effects, and event listeners, meaning they can provide immediate feedback to the user
and update the UI
- 📌 Browser APIs: Client Components have access to browser APIs, like geolocation or localStorage
Some code 👨💻
  'use client'
  import { useState } from 'react'

  export default function Counter() {
    const [count, setCount] = useState(0);
    return (
      <div>
        <p>You clicked {count} times</p>
        <button onClick={() => setCount(count + 1)}>Click me</button>
      </div>
    )
  }
Now we can explore the special file

layout.tsx
A layout is UI that is shared between multiple routes.
On navigation, layouts preserve state, remain interactive, and do not re-render. Layouts can also be nested.
    interface LayoutProps {
      children: React.ReactNode
    }
    export default function DashboardLayout({children}: LayoutProps) {
      return (
        <section>
          {children}
        </section>
      )
    }
The Root layout
The Root layout is defined at the top level of the app directory and applies to all routes.
This layout is required and must contain html and body tags, allowing you to modify the initial HTML returned from the server.
api SEO nextJS
server component by default and cannot turn in client component
    interface RootLayoutProps {
      children: React.ReactNode
    }
    export default function RootLayout({children}: RootLayoutProps) {
      return (
        <html lang="en">
          <body>
            {/* Layout UI */}
            <main>{children}</main>
          </body>
        </html>
      )
    }
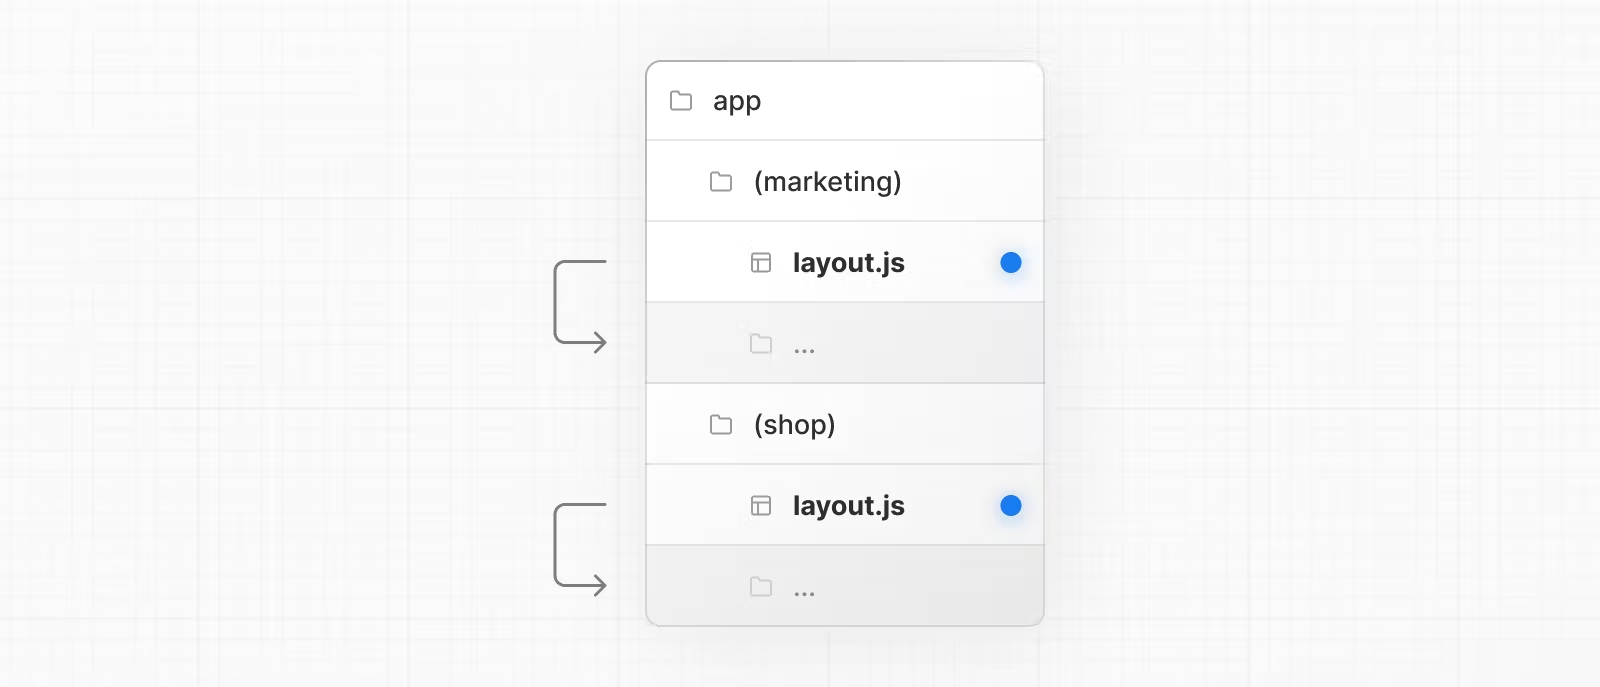
Multiple Root Layouts
Multiple Root Layouts
To create multiple root layouts, remove the top-level layout.tsx file, and add a layout.tsx file inside each route groups.
This is useful for partitioning an application into sections that have a completely different UI or experience. The <html> and <body> tags need to be added to each root
layout.
Nesting Layouts
Nesting Layouts
You can nest layouts to create a hierarchy of shared UI. When a route changes, the layout hierarchy is preserved, and only the necessary layouts are re-rendered.
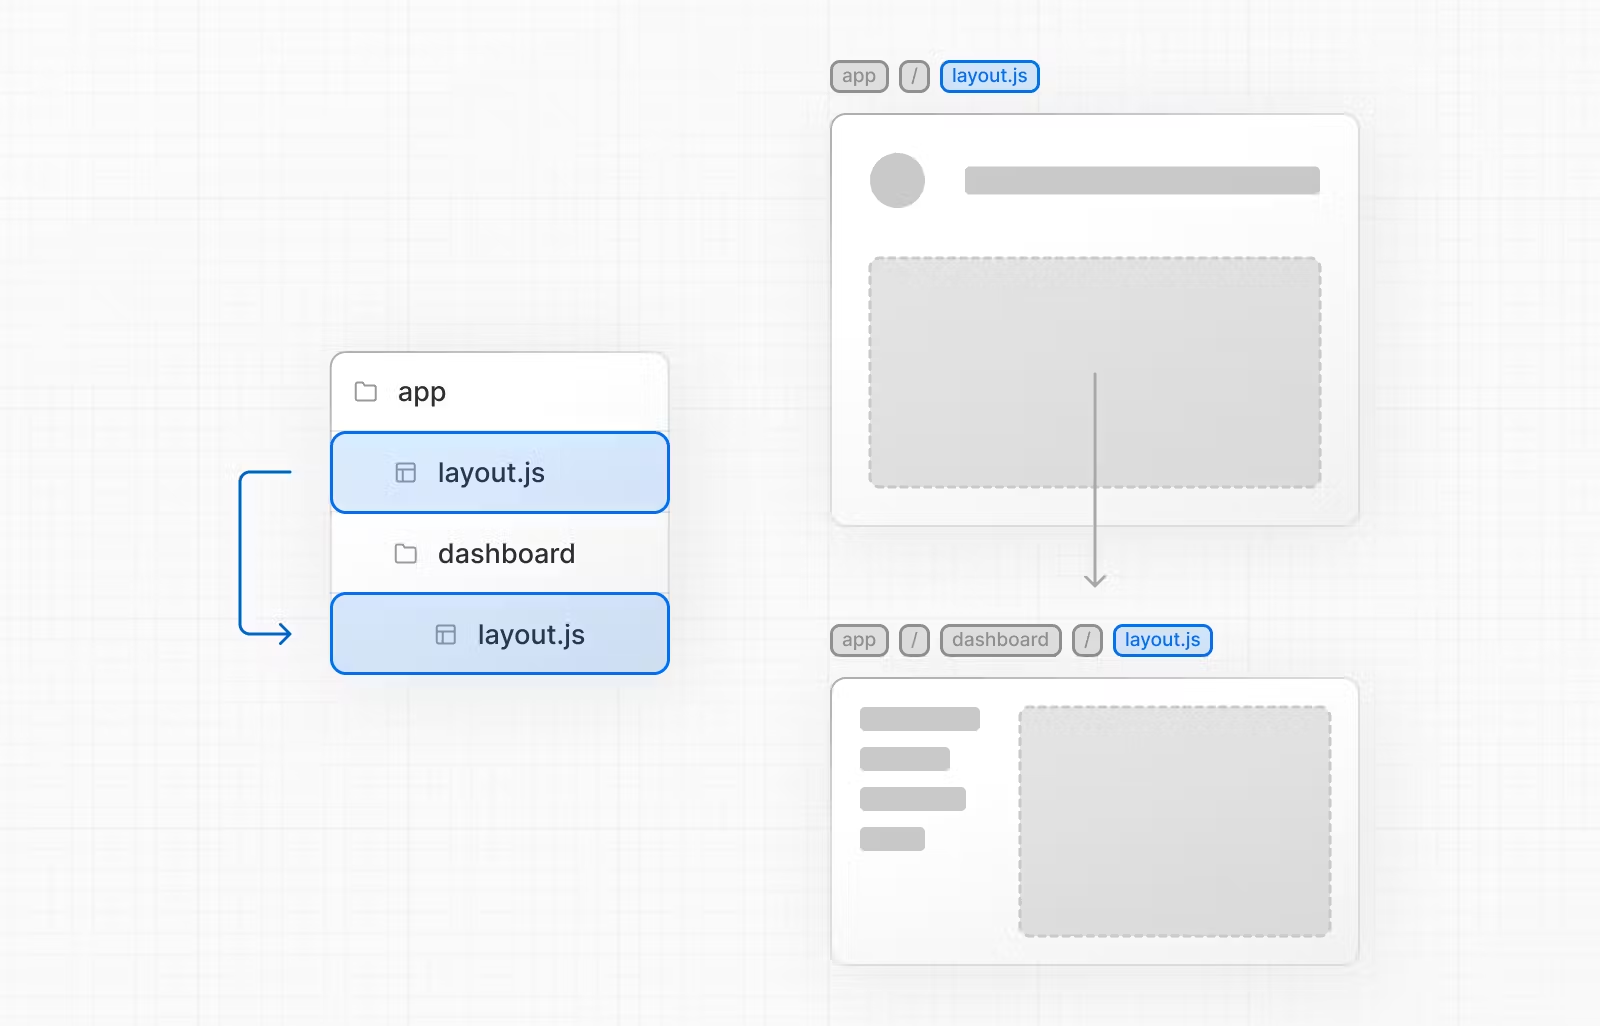
Layout: functions hooks
By default, layouts do not have access to the current segment, due to their nature as server components
(╥﹏╥)
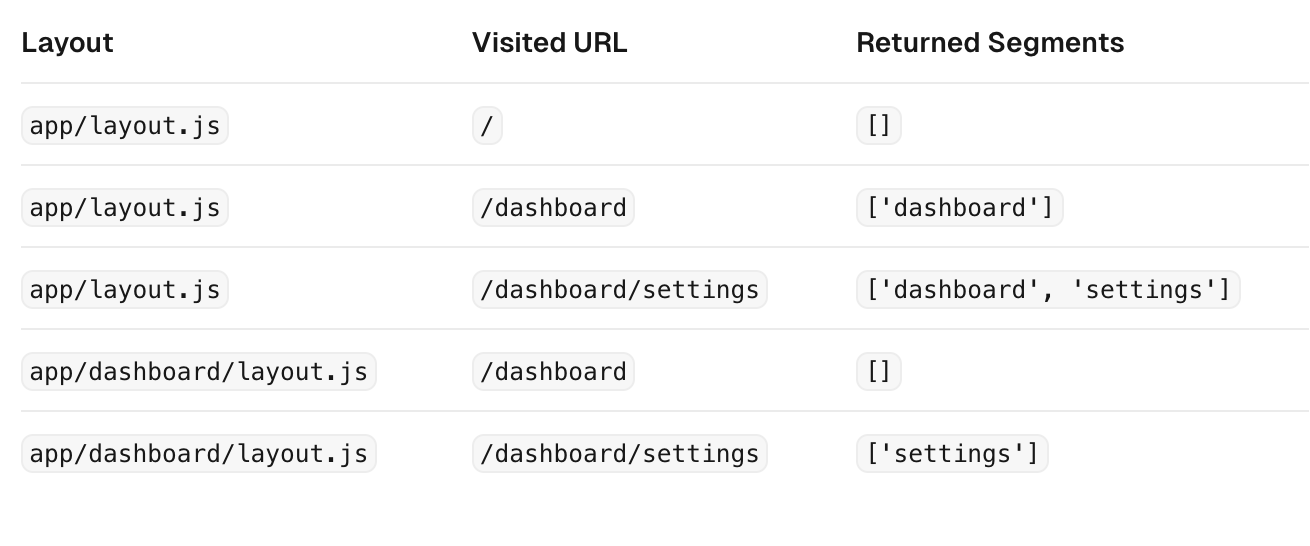
NextJS comes with two hooks for retrieving information
useSelectedLayoutSegment
useSelectedLayoutSegments
😎👌🔥
...but you can use only on client component...
useSelectedLayoutSegment
allows retrieval of the active route segment
  'use client'
  import { useSelectedLayoutSegment } from 'next/navigation'

  export default function ExampleClientComponent() {
    //Example: if we are on <root>/dashboard/user
    //the retrieved value is the string 'user'."
    const segment = useSelectedLayoutSegment()
    return <p>Active segment: {segment}</p>
  }
useSelectedLayoutSegments
allows retrieval of the active route segment and all those before it in an array of values
    'use client'
    import { useSelectedLayoutSegments } from 'next/navigation'

    export default function ExampleClientComponent() {
      const segments = useSelectedLayoutSegments()
      //Example: if we are on <root>/dashboard/user,
      //the retrieved value is the array ['dashboard', 'user']."
      return (
        <ul>
          {segments.map((segment, index) => (
            <li key={index}>{segment}</li>
          ))}
          </ul>
      )
    }
❗️All values are relative to where the hook is invoked.❗️
page.tsx
🚪 The page file is the entry point for each route
  // `app/page.tsx` is the UI for the `/` URL
  export default function Page() {
    return <h1>Hello, Home page!</h1>
  }
The page file is the entry point for each route.
Without it, it's not possible to render the requested route. Each page inherits the layouts and templates of that specific route.
Every page is a server component by default
To become a client component you must add 'use client' at the beginning of the file.
Some code 👨💻
    'use client'

    // `app/page.tsx` is the UI for the `/` URL
    export default function Page() {
      return <h1>Hello, from the client pageeeee!</h1>
    }
loading.tsx
The loading.tsx file is loaded by the framework when UI components are loaded and is nested within the layout.
⏳
It encapsulates the page.tsx file and its respective children with the native React Suspense tag.
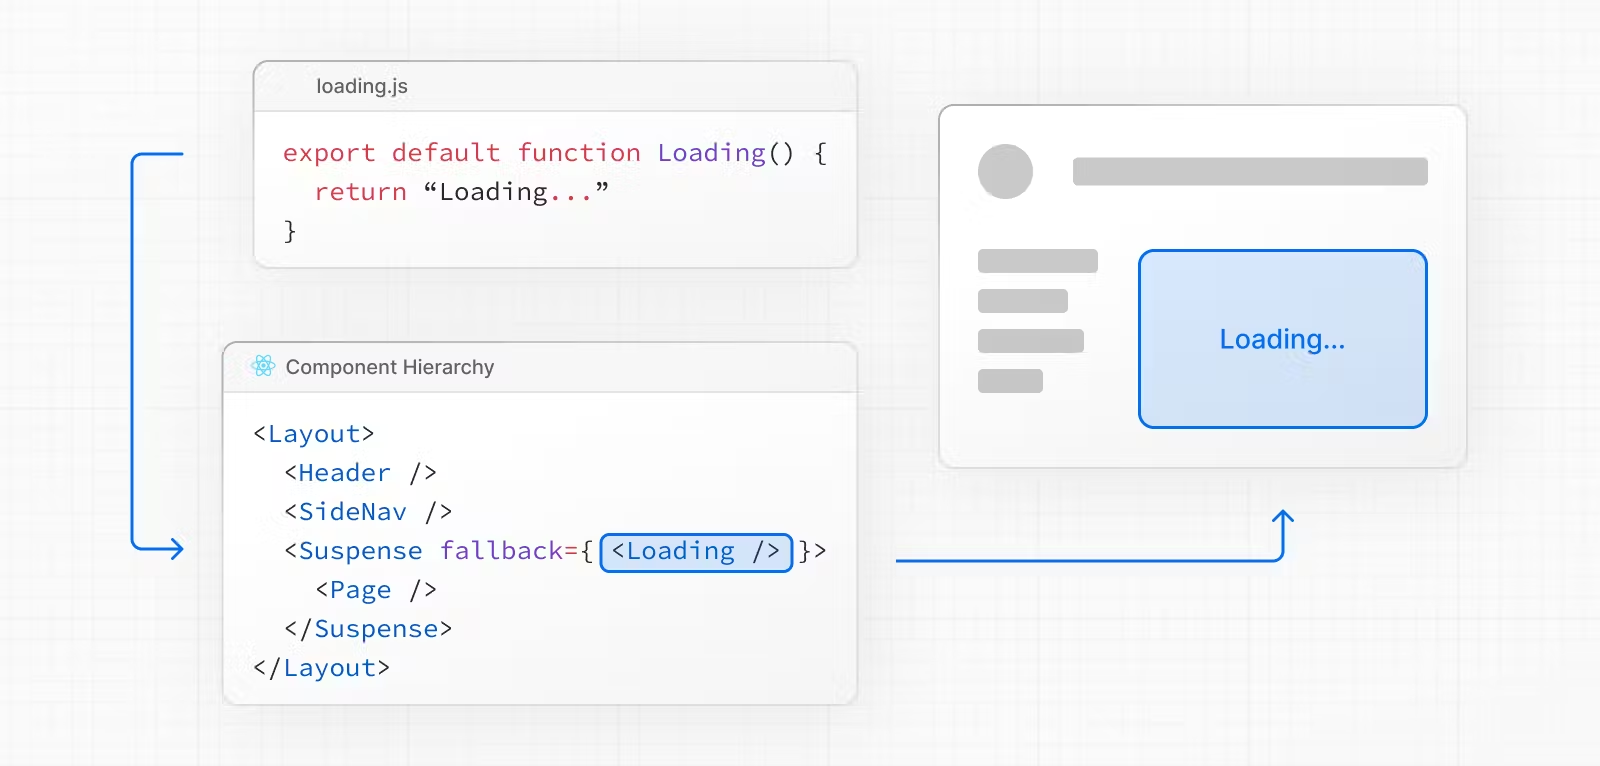
Some code 👨💻
    export default function Loading() {
      // You can add any UI inside Loading
      return 'Loading...'
    }
not-found.tsx
The not-found file serves to provide a courtesy page if a resource not present in the routing of our application is requested
🤷♂️
Some code 👨💻
    import Link from 'next/link'

    export default function NotFound() {
      return (
        <div>
          <h2>Not Found</h2>
          <p>Could not find requested resource</p>
          <Link href="/">Return Home</Link>
        </div>
      )
    }
Important
The not-found file does not accept any type of props
🫵 Good to know 🫵
In addition to catching expected notFound() errors, the root app/not-found.tsx file also handles any unmatched URLs for your whole application.
error.tsx / global-error.tsx
The error file allows rendering a courtesy page to handle any type of error that may occur during the rendering of a component.
🚨
The framework uses React ErrorBoundary to catch the error, encapsulating the page file inside it.
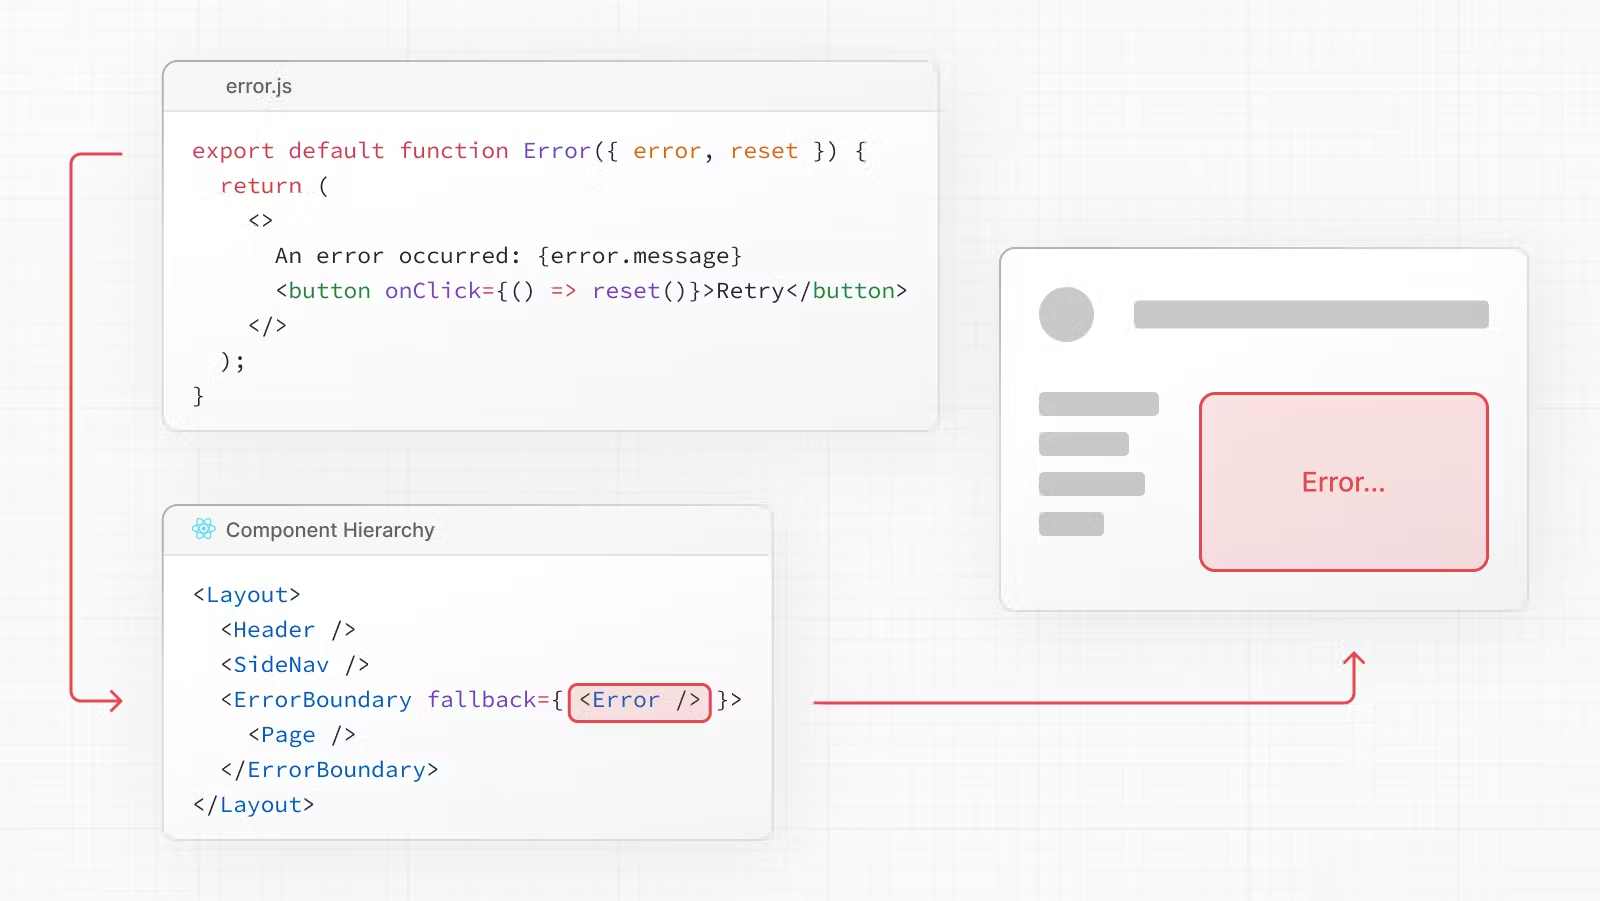 Through the reset prop, it's possible to request the framework to attempt to reload the component, triggering a new render of it.
It's important to remember that a component's error bubbles up through all parent routes until it finds an error component that intercepts them."
Through the reset prop, it's possible to request the framework to attempt to reload the component, triggering a new render of it.
It's important to remember that a component's error bubbles up through all parent routes until it finds an error component that intercepts them."
Some code 👨💻
    'use client' //<- Error components must be Client Components
    export default function Error({ error, reset}: {
      error: Error & { digest?: string }
      reset: () => void
    }) {
      return (
        <div>
          <h2>Something went wrong!</h2>
          <button onClick={() => reset()}>Try again</button>
        </div>
      )
    }
route.tsx
Route Handlers allow you to create custom request handlers for a given route using the Web Request and Response APIs.
🚀
Supported HTTP Methods
The following HTTP methods are supported: GET, POST, PUT, PATCH, DELETE, HEAD, and OPTIONS.
Important
If an unsupported method is called, NextJS will return a 405 Method Not Allowed response.
👇 In this example, a route with the path <root>/api will be generated
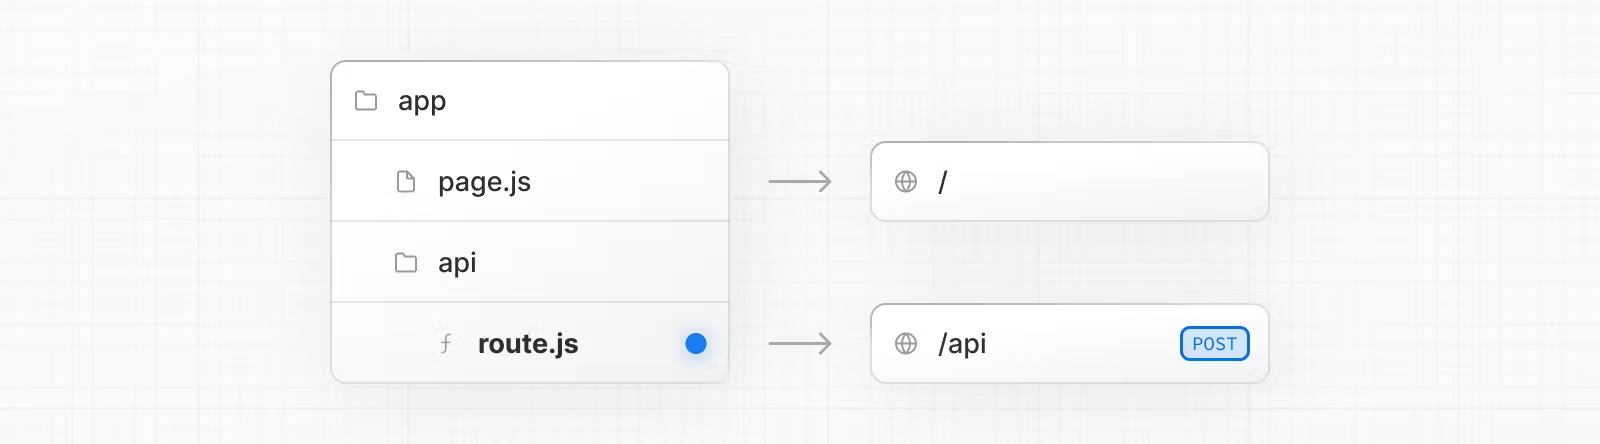 By convention, they are placed inside the api folder and can be positioned within any segment of the routing
Some code 👨💻
    export async function GET() {
      const res = await fetch('https://data.mongodb-api.com/...', {
        headers: {
          'Content-Type': 'application/json',
          'API-Key': process.env.DATA_API_KEY,
        },
      })
      const data = await res.json()

      return Response.json({ data })
    }
🌟 Some tips 🌟
- 📌 Route Handlers are cached by default when using the GET method with the Response object.
- 📌 Route do not participate in layouts or client-side navigations like page
- 📌 Route cannot be a route.tsx file at the same route as page.tsx.
template.tsx
A template is similar to a layout.
Unlike layouts that persist across routes and maintain state, templates create a new instance for each of their children on navigation.
🖼️
Some code 👨💻
    export default function Template({ children } {
      return <div>{children}</div>
    }
Why should I choose templates instead of layouts? 🤔
- 📌 Features that rely on useEffect (e.g logging page views) and useState (e.g a per-page feedback form).
- 📌 Components that need to be re-rendered on navigation.
-
📌 To change the default framework behavior.
For example, Suspense Boundaries inside layouts only show the fallback the first time the Layout is loaded and not when switching pages. For templates, the fallback is
shown on each navigation.
default.tsx
The default file is used to render a fallback within Parallel Routes when NextJS cannot recover a slot's active state after a full-page load.
But wait... what is Parallel Route? 🤔
Parallel Routes allows you to simultaneously or conditionally render one or more pages within the same layout.
🚴 🚴
⚙️ How to activate ⚙️
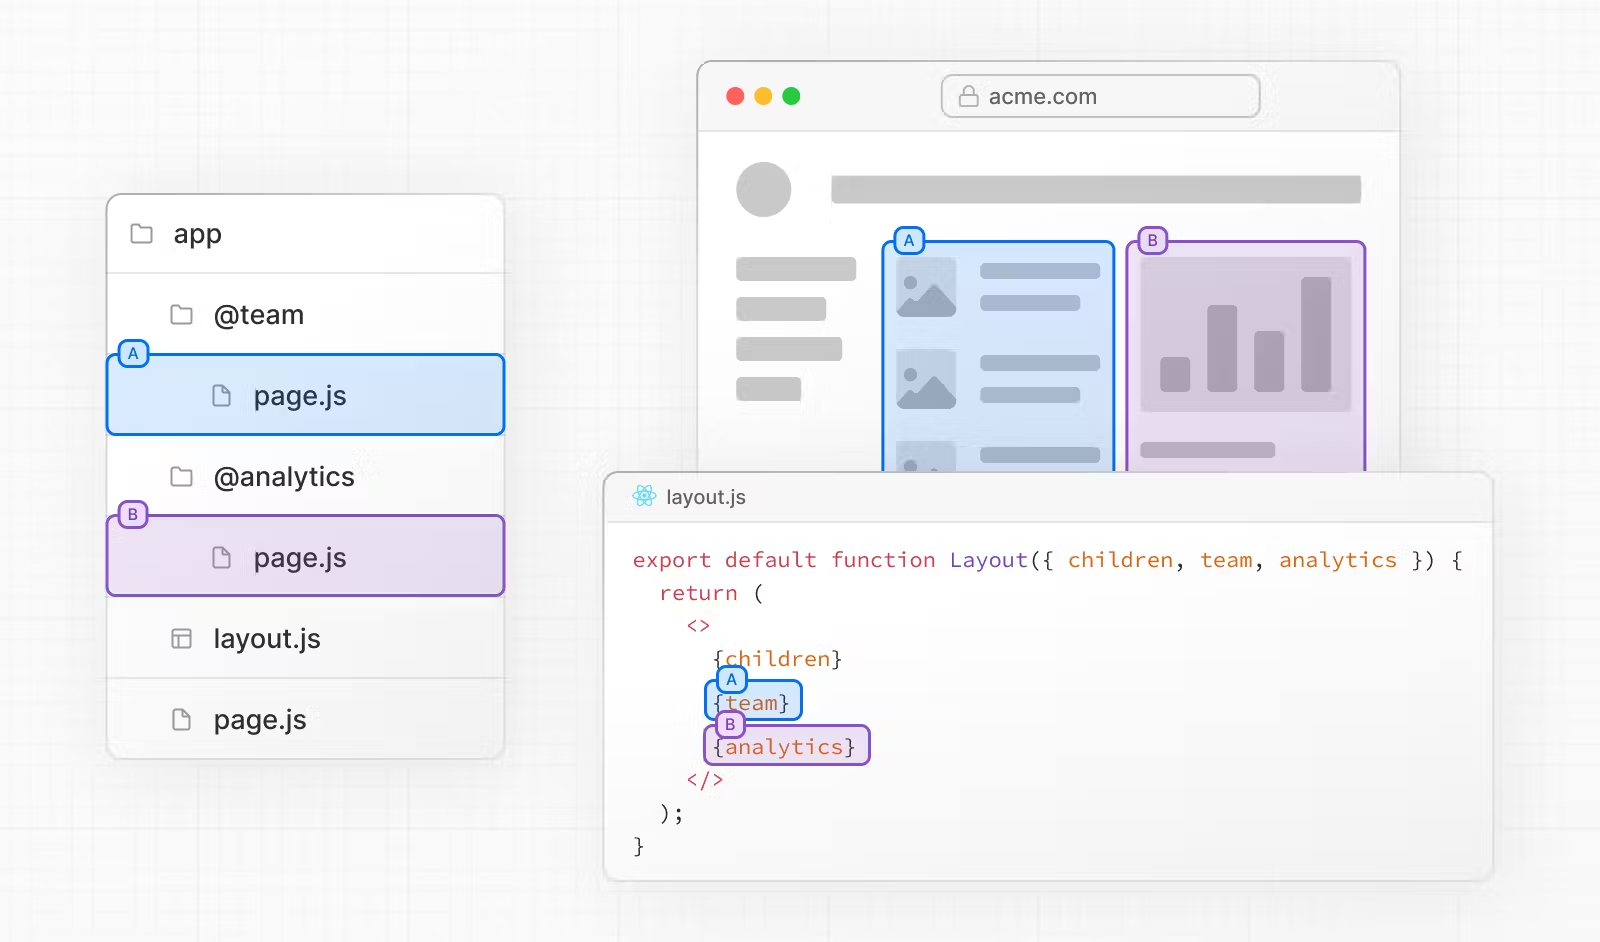 For example, considering a dashboard, you can use parallel routes to simultaneously render the team and analytics pages
Parallel routes are created using named slots. Slots are defined with the @folder convention. For example, the following file structure defines two slots: @analytics and
@team
For example, considering a dashboard, you can use parallel routes to simultaneously render the team and analytics pages
Parallel routes are created using named slots. Slots are defined with the @folder convention. For example, the following file structure defines two slots: @analytics and
@team
Some code 👨💻
    export default function Layout({ children, team, analytics}) {
      return (
        <>
          {children}
          {team}
          {analytics}
        </>
      )
    }
So this sounds great, but what about the default.tsx file? 🤔
As we said, the default.tsx file is used to render a fallback within Parallel Routes when NextJS cannot recover a slot's active state after a full-page load.
🤷♂️
This file is optional and can be used to render a fallback UI when the active state of a slot cannot be recovered after a full-page load. It is also used to render a fallback
UI when the slot is not defined in the layout.
full page load: when user reload the page
Some code 👨💻
    import Page, { PageProps } from './page'

    export default async function Default(props: PageProps) {
      return (
        <Page {...props} />
      )
    }
Functions and Api
Next.js has a range of framework functions and APIs that are truly useful during the development of our application.
useParams
    'use client'
    import { useParams } from 'next/navigation'

    export default function ExampleClientComponent() {
      const params = useParams<{ tag: string; item: string }>()

      // Route -> /shop/[tag]/[item]
      // URL -> /shop/shoes/nike-air-max-97
      // `params` -> { tag: 'shoes', item: 'nike-air-max-97' }
      console.log(params)
    }
useSearchParams
    'use client'
    import { useSearchParams } from 'next/navigation'

    export default function SearchBar() {
      const searchParams = useSearchParams()
      const search = searchParams.get('search')

      // URL -> `/dashboard?search=my-project`
      // `search` -> 'my-project'
      return <>Search: {search}</>
    }
useRouter
    'use client'
    import { useRouter } from 'next/navigation'

    export default function Page() {
      const router = useRouter()
      return (
        <button type="button" onClick={() => router.push('/dashboard')}>
          Dashboard
        </button>
      )
    }
Optimizing
NextJS comes with a variety of built-in optimizations designed to improve your application's speed and Core Web Vitals.
🏎️💨
The strength of NextJS, compared to other frameworks, lies precisely in its strongly performance-oriented web development and SEO, making it decidedly one of the best choices
in web ranking
Built-in Component
Built-in components abstract away the complexity of implementing common UI optimizations. These components are
-
🖼 Image: Built on the native <img /> element. The Image Component optimizes images for performance by lazy loading and automatically
resizing images based on device size
-
🌐 Link: Built on the native <a> tags. The Link Component prefetches pages in the background, for faster and smoother page
transitions.
-
📝 Script: Built on the native <script> tags. The Script Component gives you control over loading and execution of third-party
scripts
Some code 👨💻
    import Image from 'next/image'
    import profilePic from './me.png'

    export default function Page() {
      return (
        <Image
          src={profilePic}
          alt="Picture of the author"
        />
      )
    }
Metadata
The Metadata API in Next.js allows you to modify the <head> element of a page. You can configure metadata in two ways:
-
📌 Config-based Metadata: Export a static metadata object or a dynamic generateMetadata function in a layout.tsx or page.tsx file.
- 📌 File-based Metadata: Add static or dynamically generated special files to route segments.
Static metadata 🗿
  import type { Metadata } from 'next'

  export const metadata: Metadata = {
    title: '...',
    description: '...',
  }

  export default function Page() {}
Dynamic metadata 🏃🏻♀️
    import type { Metadata, ResolvingMetadata } from 'next'
    //....
    export async function generateMetadata(
      { params, searchParams }: Props,
      parent: ResolvingMetadata
    ): Promise<Metadata> {
      const id = params.id // read route params
      const product = await fetch(`https://.../${id}`).then((res) => res.json())

      return {
        title: product.title,
      }
    }
    export default function Page({ params, searchParams }: Props) {}
🫵 Good to know 🫵
- 📌 Both static and dynamic metadata through generateMetadata are only supported in Server Components.
- 📌 Fetch requests are automatically memoized for the same data across generateMetadata
-
📌 NextJS will wait for data fetching inside generateMetadata to complete before streaming UI to the client. This guarantees the first part of a streamed response includes
<head> tags.
Lazy Loading
Lazy loading helps improve the initial loading performance by decreasing the amount of JavaScript needed to render a route.
🥱
There are two ways you can implement lazy loading in NextJS
👉 Using Dynamic Imports with next/dynamic
👉 Using React.lazy() with Suspense
next/dynamic is a composite of React.lazy() and Suspense. It behaves the same way in the app and pages directories to allow for incremental migration
Some code 👨💻
import dynamic from 'next/dynamic'
const DynamicHeader = dynamic(() => import('../components/header'), {
loading: () => Loading...
,
})
export default function Home() {
return <DynamicHeader />
}
Testing
But...With Cypress
٩(^ᗜ^ )و ´-
You can use a lot of tool like Vitest Jest Playwright Cypress
Configuration
Quick setup
npx create-next-app@latest --example with-cypress with-cypress-app
Manual setup
npm install -D cypress
# or
yarn add -D cypress
# or
pnpm install -D cypress
Just a little example
Component code 👨💻
    import Link from 'next/link'

    export default function Page() {
      return (
        <div>
          <h1>About</h1>
          <Link href="/">Home</Link>
        </div>
      )
    }
Component test code 👨💻
    import Page from '../../app/page'

    describe('<Page />', () => {
      it('should render and display expected content', () => {
        cy.mount(<Page />)

        cy.get('h1').contains('About')

        cy.get('a[href="/"]').should('be.visible')
      })
    })
Useful Tool
SWR
The team behind NextJS has created a React hook library for data fetching called SWR.
- 📌 Fast, lightweight and reusable data fetching
- 📌 Built-in cache and request deduplication
- 📌 Real-time experience
- 📌 Transport and protocol agnostic
- 📌 SSR / ISR / SSG support
- 📌 TypeScript ready
The team behind Next.js has created a React hook library for data fetching called SWR. It is highly recommended if you are fetching data on the client-side. It handles
caching, revalidation, focus tracking, refetching on intervals, and more.
Some code 👨💻
    import useSWR from 'swr'
    const fetcher = (...args) => fetch(...args).then((res) => res.json())

    function Profile() {
      const { data, error } = useSWR('/api/profile-data', fetcher)
      if (error) return <div>Failed to load</div>
      if (!data) return <div>Loading...</div>
      return (
        <div>
          <h1>{data.name}</h1>
          <p>{data.bio}</p>
        </div>
      )}
Using the same example as above, we can now use SWR to fetch the profile data. SWR will automatically cache the data for us and will revalidate the data if it becomes stale.
👇 Follow this link for more information and options! 👇
https://swr.vercel.app/
Zustand
A small, fast and scalable bearbones state-management solution using simplified flux principles. Has a comfy API based on hooks, isn't boilerplatey or opinionated.
https://github.com/pmndrs/zustand
Why zustand over context?
- 📌 Less boilerplate
- 📌 Renders components only on changes
- 📌 Centralized, action-based state management

Some code 👨💻
    import { create } from 'zustand'

    type Store = {
      count: number
      inc: () => void
    }

    const useStore = create<Store>()((set) => ({
      count: 1,
      inc: () => set((state) => ({ count: state.count + 1 })),
    }))

    function Counter() {
      const { count, inc } = useStore()
      return (
        <div>
          <span>{count}</span>
          <button onClick={inc}>one up</button>
        </div>
      )
    }

You can find this slide on
 https://marcopollacci.github.io/nextjs-for-beginner/gellify
Thank you again!
Marco Pollacci
Senior Software Developer @GELLIFY
Leave some feedback